Table of Contents
Using the Polycom SoundStation2
The Blackburn Room is equipped with a Polycom SoundStation2 audio phone conferencing system.
Setting Up the Polycom SoundStation2
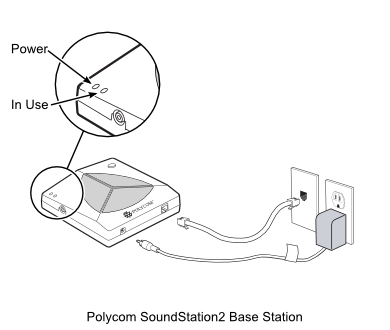
Polycom SoundStation2 Base Station
The SoundStation2 Base Station connects to the phone jack at the Crestron Control Panel and provides a wireless connection to the SoundStation2 Console.
To connect the Polycom SoundStation2 Base Station:
- Retrieve the Base Station from the Equipment Cabinet.
- Place the Base Station on the window ledge next to the Crestron Panel and connect the power cord to a free power outlet. The cord has been wrapped to provide sufficient slack to reach an outlet without excess.
- Connect the phone cord to jack V4038N-08 (the one on the upper left).
Troubleshooting
- Confirm the power LED is active when the Base Station is plugged in. There is no ON/OFF switch, so if the LED is not on, confirm the power cable is securely inserted.
- Otherwise, ask your Booking Contact or the IC Operations Group for technical support.
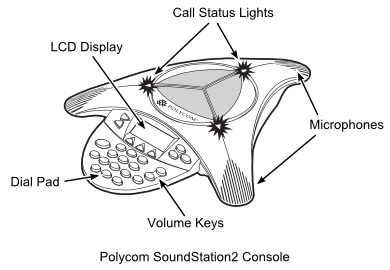
Polycom SoundStation2 Console
To set up the Polycom SoundStation2 Console:
- Retrieve the Console from the Equipment Cabinet.
- Place the Console at the table in front of the primary user(s).
- The Console contains a rechargeable battery that should provide power for a maximum of 8 hours usage. You may wish to instead connect the power cord to a table power-bar or floor outlet.
- Wait for Console to connect to the Base Station. The LCD Panel will indicate
Ready.
Placing a Call:
- Dial the desired number. (Remember, UofT phone systems need 9 first to dial out)
- To cancel the call, press the Handset Button again.
Answering a Call:
- The three Call Status LEDs will blink green when the phone rings.
- The phone number in the Blackburn Room is (416) 978-8257. This number is also on a label on the Console for easy access.
Answering a Second Call:
- If you are on a call when another call is received, you will hear a tone.
- Switch back and forth between calls using the Conference Button.
Adding a Second Call:
- Dial the number you wish to call.
- Once the second party has answered, press the Conference Button to join the second party to the original call.
- To drop the second call, press the Conference Button again.
Ending a Call:
- To end a call, press the Handset Button.
Placing a Call on Hold:
- To place a call on hold, press the LCD Menu Button under the
HOLDentry. - To resume a call, press the LCD Menu Button under the
RESUMEentry.
Muting a Call:
- To unmute a call, press the Mute Button again.
Redialing a Call:
- To re-dial the number of your last call, press the LCD Menu Button under the
REDIALentry.
Adjusting Speaker Volume:
- To adjust the speaker volume, press Volume Up and Volume Down Buttons as necessary.
- During a call, the Volume Buttons adjust the Speaker volume.
- When in the Ready state (on-hook), the Volume Buttons adjust the Ringer volume.
- When listening to a dial tone (off-hook), the Volume Buttons adjust Dial Tone volume.
Troubleshooting
- If the LCD panel indicates
NO SIGNALrather thanREADY, confirm the Base Station is on and that it is within range of the Console (being out of range shouldn't be possible inside the Blackburn Room). - If the LCD panel indicates
Low Battery, Please Charge(or the unit is beeping), then the internal battery is below 20% charge. Connect the power cable to a table/floor outlet and confirm the power cord is securely attached to the Console. - if the LCD panel indicates
Charging, the charger is connected and the battery is recharging. The system may be used while the battery recharges. - If no Dial Tone is heard after pressing the Handset Button, confirm the phone cord is attached to the Base Station and the upper left phone jack, V4038N-08.
- If you hear short silences, echos, or clipped speech, this may be caused by excessive noise close to a microphone. Move laptops, papers, cups, and other noise-producers away from the console and microphones.
- Otherwise, ask your Booking Contact or the Information Commons Operations Group for technical support.
Polycom Extended Microphones
The Polycom SoundStation2 comes with two satellite microphones with 2.5 metre (8 foot) cables. The microphones can be placed around a larger table where participants would be too far removed from the Console to be heard effectively. The extended microphone supplement the 3 microphones built into the Console.
To connect the Polycom Extended Microphones:
- Retrieve the Extended Microphones from the Equipment Cabinet.
- Unwind the cords and connect the modular plug to the jacks on the side of the Polycom Console.
Using the Polycom Extended Microphones:
- The extended microphones have a
MUTEbutton that will only effect the local microphone. Muting of all microphones is controlled from the Console. - Press the
MUTEbutton again to restore activity.
Finishing Your Session
- Disconnect any Extended Microphones, neatly wrap the cables, and return them to the Equipment Cabinet.
- Disconnect the power from the Polycom Console, and return to the Equipment Cabinet. Reconnect the power cord to the outlet in the Equipment Cabinet to recharge the Console battery.
- Disconnect the power and phone cables from the Polycom Base Station. Return the unit to the Equipment Cabinet.

