Using the Presentation Aids
The Blackburn Room's is equipped with a number of peripherals to aid you in your presentation.
Microphones
We recommend the use of a microphone to ensure you can be heard and understood easily.
While the acoustics of the Blackburn Room are quite good, the soft ceiling panels tend to attenuate some voices more than the speaker might expect. When combined with noise filtering in from the outside public areas, people in the back of a filled room can have trouble hearing clearly.
Since most people tend to have an active and interactive presentation style that will draw them away from the lectern, a wireless microphone is a good choice for most presenters.
Lectern Microphone
The lectern microphone is normally connected and active. You can test it with a light tap and adjust the volume level on the Crestron Panel.
To adjust the Lectern Microphone volume levels:
- On the Crestron Panel, select
Volumefrom the right sidebar. - Under the
Lectern Microphonevolume indicator (middle set of controls):- Select and hold the
Decreasebutton to decrease the volume, - Select and hold the
Increasebutton to increase the volume, - Select the
Mutebutton to mute (or unmute) the volume.
Troubleshooting
- Check on the Crestron Panel that:
- the
Lectern Microphoneis not muted. - the
Lectern Microphonevolume level is not minimized (left portion of volume bar should be coloured in).
- Otherwise, ask your Booking Contact or the IC Operations Group for technical support.
Wireless Microphones
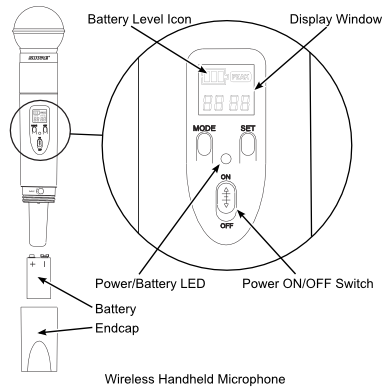
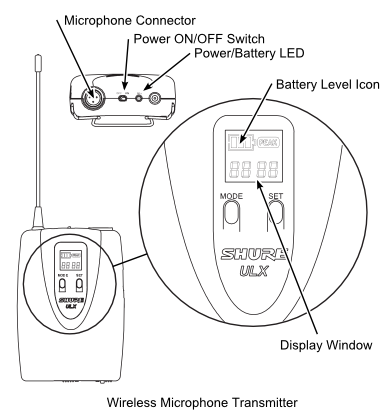
There are two wireless microphones - a lapel microphone with a belt-clip transmitter and a self-contained, handheld unit. The lapel microphone is easiest for most presenters to use. The handheld microphone is recommended for audience participation.
Please note that only one wireless microphone can be used at a time. The first microphone turned on will lock to the receiver, preventing the second from transmitting. To switch microphones, turn off the first, disconnecting it from the receiver, and then turn on the other.
A wireless microphone can be used simultaneously with the lectern microphone.
To use a wireless microphone:
- Select the wireless microphone you intend to use.
- The wireless microphones are stored in the lectern cabinet in pouches.
- To use the lapel microphone:
- Attach the microphone to your lapel approximately … cm (… inches) from your mouth.
- Attach the transmitter to your belt.
- Turn on the unit by flipping the power switch to ON.
- A green power light should come on once the microphone is transmitting.
- To ensure good battery level, check the battery indicator on the LCD screen and confirm the power light isn't red.
- To use the handheld microphone:
- Turn on the unit by flipping the power switch to ON.
- A green power light should come on once the microphone is transmitting.
- To ensure good battery level, check the battery indicator on the LCD screen and confirm the power light isn't red.
- Adjust the speaker volume on the Crestron Panel to an appropriate level:
- On the Crestron Panel, select
Volumefrom the right sidebar. - Under the
Wireless Microphonevolume indicator (rightmost set of controls), Decrease,Increase, orMuteby pressing the appropriate button.
Finishing with the wireless microphone:
- Please check the battery level before putting away and report low levels to your Booking Contact.
- Turn the power switch off and confirm the power light is off.
- Return the device to its pouch and return the pouch to the lectern cabinet.
Troubleshooting
- Check on the bodypack/microphone that the power switch is on, and the power LED is green.
- Check on the LCD, that the Group is 01 and the Channel is 01.
- Check on the Crestron Panel that:
- the
Wireless Microphoneis not muted. - the
Wireless Microphonevolume level is not minimized (left portion of volume bar should be coloured in).
- Otherwise, ask your Booking Contact or the IC Operations Group for technical support.
Hearing Assistance Receivers
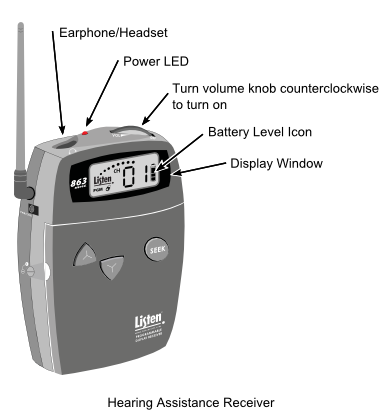
The Blackburn Room has a hearing assistance system. Audio from the display devices and microphones can be transmitted to up to eight receivers. Each unit has a volume control that can be adjusted to the user's needs.
The units are stored in the side cabinet in the charging case. Headphones suitable for the receivers can be found on the lower shelf, or standard personal headphones can be used if preferred.
To use a hearing assistance receiver:
- Select a receiver and remove from the storage case,
- Attach a set of standard stereo headphones (user supplied or from the supply on the lower shelf) to the 1/8-inch output jack on top of the receiver.
- Clip receiver to belt or waistband.
- Turn volume dial slightly until it clicks on and activates at a low volume.
- Place headphones over ears and adjust volume upwards until volume level is comfortable.
Finishing with the hearing assistance receiver:
- Turn off the unit.
- Detach headphones.
- If headphones were borrowed, return them to the shelf with the cord neatly wound.
- Place the unit back in the aluminum storage case and confirm the red charging LED comes on.
- Note: Please do not close the lid of the aluminum storage case to prevent charger overheating.
Troubleshooting
- Check that the power/volume dial is on, and the power LED is red and unblinking.
- If the power light is blinking or the LCD battery indicator shows low levels, select another receiver and report the problem to your Booking Contact.
- Check on the LCD that the Channel is 00.
- Otherwise, ask your Booking Contact or the IC Operations Group for technical support.
Computer Input Devices
Wired Keyboard and Mouse
The Room PC has a wired keyboard installed at the lectern. On the upper, right side of the keyboard, there are two USB ports that additional peripherals can be attached to.
To use the wired keyboard:
- Connect the keyboard to the white USB cable labeled Room PC Keyboard.
- Confirm the keyboard is connected by looking for the blue NumLock LED.
Troubleshooting
- If the NumLock LED is off, press the NumLock key once.
- If the NumLock LED is off, confirm the keyboard is connected to the white Room PC Keyboard USB Cable.
- If the NumLock LED is off, disconnect the USB cable, wait 2 or 3 seconds and reconnect.
- The keyboard may not work correctly if a USB storage key is attached. USB storage keys are not supported as they will draw more power than the keyboard can supply. Move the USB storage key to a Crestron Panel USB port.
- Otherwise, ask your Booking Contact or the IC Operations Group for technical support.
Wireless Keyboard
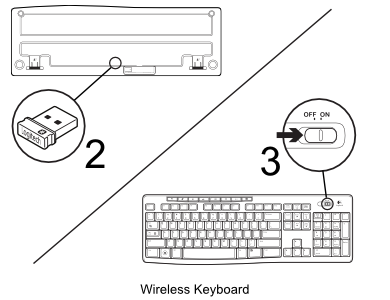
There is a Wireless Keyboard that can be used to control the Room PC from anywhere in the room. The Wireless Keyboard has a receiver/dongle that can be attached to the Wired Keyboard USB port and is stored in a slot on the back of the keyboard. The Wireless Keyboard is stored in the locked Equipment Cabinet.
To use the Wireless Keyboard:
- Retrieve the Wireless Keyboard from its box in the Equipment Cabinet.
- Slide the receiver/dongle from the storage slot on the underside of the keyboard and insert it into a USB port on the Room PC keyboard (or your laptop).
- Slide the power switch on the upper right side to ON.
- There are no power or activity indicators on this keyboard.
Finishing with the Wireless Keyboard:
- Slide the power switch on the upper right side to OFF.
- Retrieve and reinsert the receiver/dongle into its slot on the underside of the keyboard.
- Return the keyboard to its box and return the box to the Equipment Cabinet.
Troubleshooting
- There are no power or activity indicators on this keyboard. Activity can be tested by opening and selecting the editing area of Notepad or another text editor.
- If typing produces no text, you may be out of range (which shouldn't be possible inside the Blackburn Room). Move closer or try to move the receiver to a location where it isn't blocked by metal or other solid objects that may be reducing the signal.
- If moving closer doesn't fix the problem, replace the batteries.
- Otherwise, ask your Booking Contact or the IC Operations Group for technical support.
Wireless Mouse
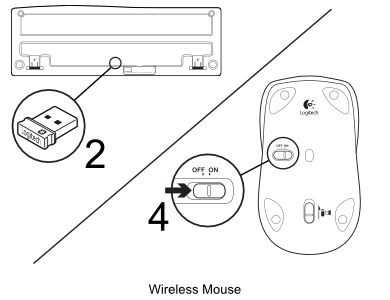
There is a Wireless Mouse that can be used to control the Room PC from anywhere in the room. It can be used in conjunction with or separately from the wireless keyboard, but it uses the Wireless Keyboard receiver/dongle regardless. The Wireless Mouse is stored in the locked Equipment Cabinet.
To use the Wireless Mouse:
- Retrieve the Wireless Keyboard from its box in the Equipment Cabinet.
- Slide the keyboard receiver/dongle from the storage slot on the underside of the keyboard and insert it into a USB port on the Room PC keyboard (or your laptop).
- Retrieve the Wireless Mouse from the Equipment Cabinet.
- Slide the power switch on the underside to ON (to the right).
- There are no power or activity indicators on this mouse.
Finishing with the Wireless Mouse:
- Slide the power switch on the underside to OFF (to the left).
- Retrieve and reinsert the keyboard receiver/dongle into its slot on the underside of the keyboard.
- Return the keyboard to its box and return the box to the Equipment Cabinet.
- Return the mouse to the Equipment Cabinet.
Troubleshooting
- There are no power or activity indicators on this mouse.
- If moving the mouse doesn't move the mouse pointer, you may be out of range (which shouldn't be possible inside the Blackburn Room). Move closer or try to move the receiver to a location where it isn't blocked by metal or other solid objects that may be reducing the signal.
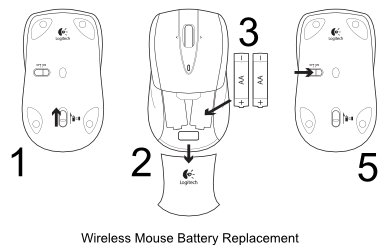
- If moving closer doesn't fix the problem, replace the batteries.
- To open the battery compartment, slide the compartment lock on the underside of the mouse towards the sensor,
- Flip the compartment lid on the top of the mouse up,
- Remove the batteries and slide new ones in.
- Replace the battery compartment lid and press down gently until it clicks shut.
- Turn the mouse back on.
- Otherwise, ask your Booking Contact or the IC Operations Group for technical support.
Presentation Remote
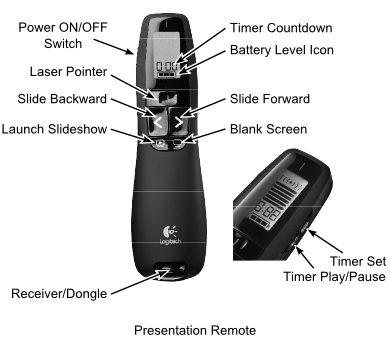
The Logitech Presentation Remote can be used to control Microsoft PowerPoint from anywhere in the room. The Presentation Remote has its own receiver/dongle that can be attached to the Wired Keyboard USB port and is stored in the body of the Remote.
The Presentation Remote also features a bright green laser pointer and a time reminder function.
To use the Presentation Remote:
- Retrieve the Presentation Remote from its case in the Equipment Cabinet.
- Slide the receiver/dongle from the base of the Remote and insert it into a USB port on the Room PC keyboard (or your laptop).
- Slide the power switch on the left side to ON (so that the Green background is showing).
- Hold the
Laser Pointerbutton to shine the green laser pointer. - Press the
Launch Slideshowbutton to start your slide show. Press again to show the Slidedeck Navigator. - Press the
Slide ForwardandSlide Backwardbuttons to move one slide forward/backward in your presentation. - Press the
Blank Screenbutton to mute/unmute your slideshow.
To use the Presentation Remote Timer:
- Press the
Timer Setbutton on the right side of the Remote. - Use the
Slide ForwardandSlide Backwardbuttons to set the timer duration. - Press the
Timer Setbutton again to confirm the time settings. - Press the
Time Play/Pauseto start the timer countdown. Pressing again will pause the timer.
- The silent alarm will vibrate with 5, 2, and 0 minutes left. The timer will start counting up after reaching zero.
- Hold the
Timer Setbutton for 3 seconds to clear the time settings.
Finishing with the Presentation Remote:
- Slide the power switch on the left side to OFF (so that the Red background is showing).
- Retrieve and reinsert the receiver/dongle into the slot at the bottom of the Remote.
- Return the remote to its carrying case and the case to the Equipment Cabinet.
Troubleshooting
- Confirm the power switch on the left side is set to ON (so that the Green background is showing).
- If the LCD battery indicator shows a low level, replace the battery or report the problem to your Booking Contact.
- If you have walked out of range (which shouldn't be possible inside the Blackburn Room), a flashing range indicator will appear at the top of the LCD. Move closer or try to move the receiver to a location where it isn't blocked by metal or other solid objects that may be reducing the signal.
- Otherwise, ask your Booking Contact or the IC Operations Group for technical support.
Confidence Monitor
(Placeholder for future implementation)
